Professional/Temp Staff / Affiliates / Student Workers:
In AiM, we use the same On-Boarding process for Permanent/Temp Staff, Affiliates and Student Workers. All require to set KEEP Hire Code under Payroll Data screen (Human Resources Module).
*Northwest HelpDesk (System Support) and AiM System Administrator shall be notified by HR Supervisor/Operations Administrators about new hires for On-Boarding process completion (AiM User Security, Roles, WorkDesk creation and iPad assignment in the AiM system).*
- Students IDs: are the Student’s worker exchange account – e.g. STUDENT5961
- Permanent/Temp employees and Affiliates IDs: are their actual UConn NET ID – e.g. ACD14005
Student On-Boarding Process Flow
Permanent/Temp Staff & Affiliates On-Boarding Process Flow
Student On-Boarding Process Flow
STUDENT WORKERS |
ROLE RESPONSIBILITIES |
| On-Boarding High Level Process – Students | 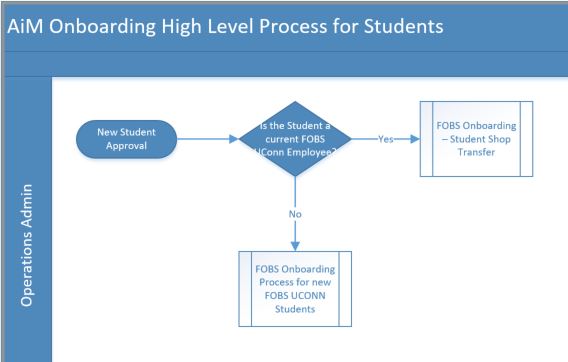 |
| On-Boarding Process – Students | 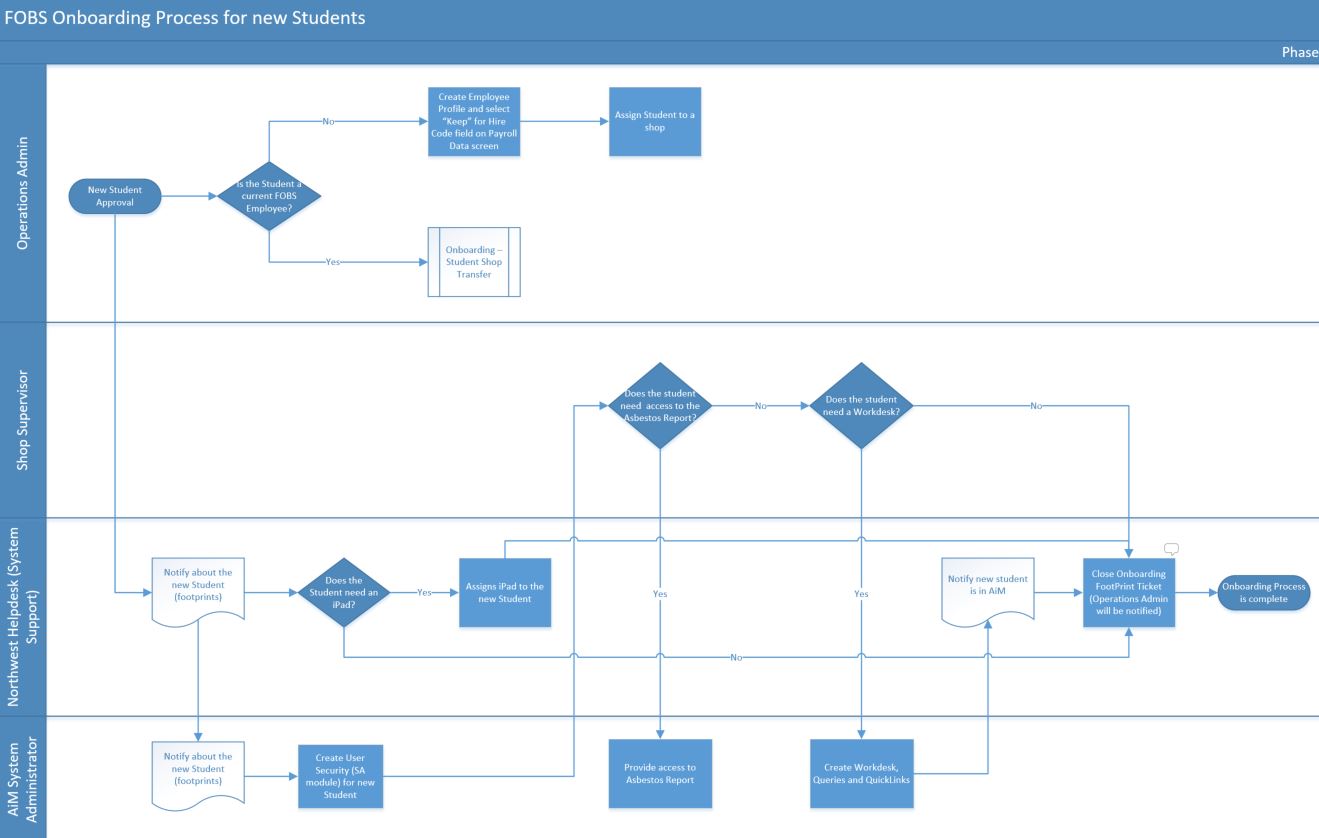 |
| On-Boarding Process – Student Shop Transfer |
Permanent/Temp Staff & Affiliates On-Boarding Process Flow
PERMANENT/TEMP EMPLOYEES & AFFILIATES |
ROLE RESPONSIBILITIES |
| On-Boarding High Level Process – Employees |  |
| On-Boarding Process – Employees |  |
| On-Boarding – Employee Shop Transfer |
PROCEDURE:
Searching Employee Profile
Creating a New Employee Profile
Assigning Shop to an Employee
Assigning Assets (iPads & Vehicles)
Transferring employees between AiM Shops
Updating the Receiving Address
Searching Employee Profile Information
To add a new employee in AiM, first search for the employee record to verify the individual hasn’t been added yet by ETL job (which runs every Friday night). When this is verified, then the HR authorized staff member may enter the new employee information manually:
| 1. Select the Human Resources link from the Main WorkDesk Menu. | 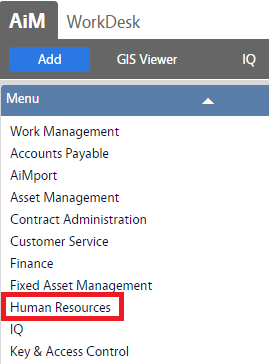 |
| 2. Click the link to the Employee Profile. | 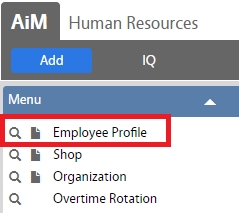 |
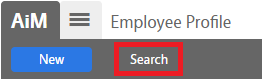
| 3. Click Search to search Employee Profile information.
The Search function allows you to narrow the results for Employees by field contents (such as First Name or Last Name, etc.) |
 |
| 4. Go through the options and enter search criteria such as First and Last Name, then click Execute. | 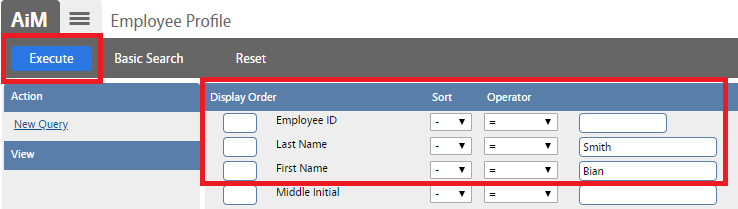 |
| In this case, search came back with “0” results, so the new employee profile can be added manually. See Creating a New Employee Profile section for instructions. |  |
Creating a New Employee Profile
The main identifying elements of the Employee Profile screen are:
| Name | Description |
| Net ID | Identifies the unique employee identification code in AiM |
| Employee Name | Captures employee information (Name, Middle Name and Last Name). |
| Active (Status) | Defines whether the employee profile is active and available for use in AiM. |
| Employee Type | Classifies an employee as a regular employee or as a shop person. The shop person classification makes the employee available for use in shops, work orders, and timecards. |
| Payroll Data | The Payroll Data view captures detailed salary and hiring information. For all, select KEEP under Hire Code section. |
If the new employee profile is not currently in the system, see below instructions on how to create a new profile.
| 1. Select the Human Resources link from the Main WorkDesk Menu. | |
| 2. Click the link to the Employee Profile. | |
| 3. Click New to enter new Employee Profile information. |  |
| 4. Enter employee Net ID, full name, set Active to Yes and Employee type to Shop Person. |  |
| 5. Click Payroll Data link to set Hire Code. | 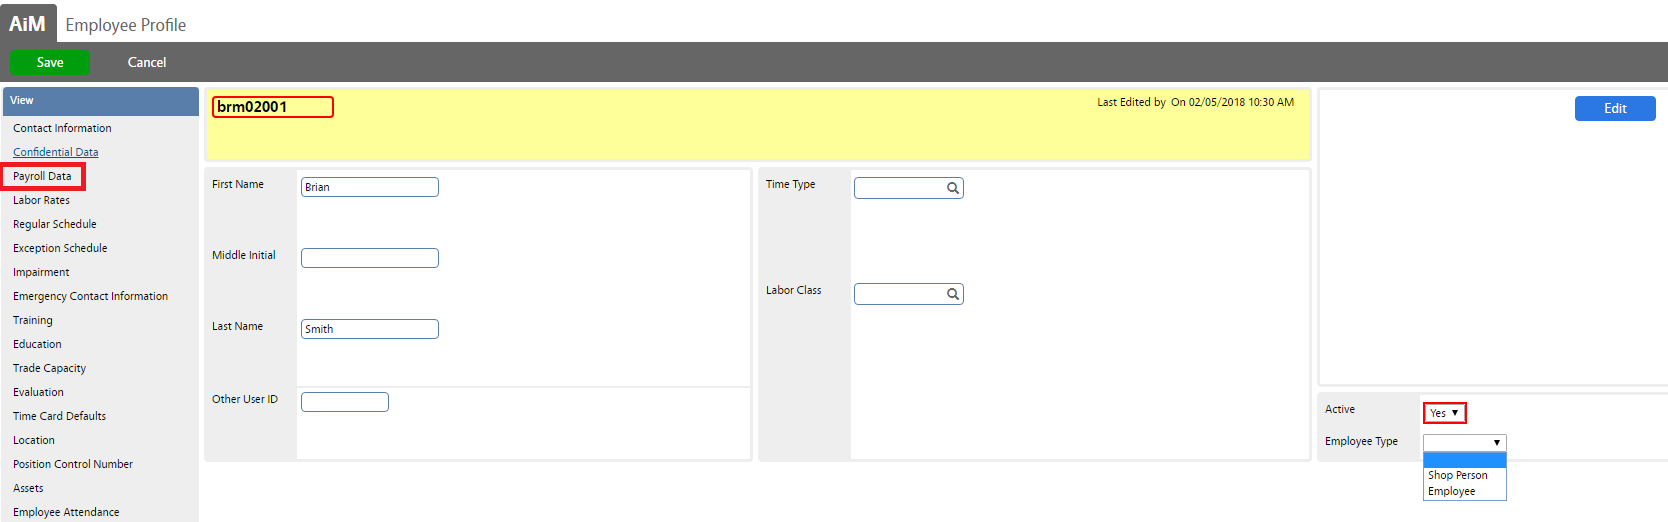 |
| 6. Click on the magnifier under Hire Code and select KEEP. | 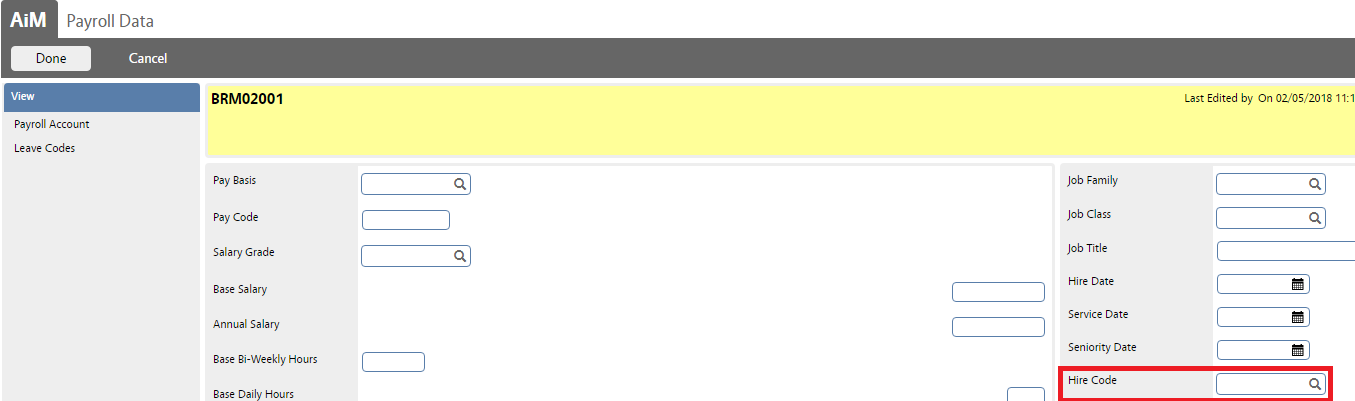 
|
| 7. Click Done to go back to the main screen. |  |
| 8. Click Save to save the record. See Assigning Shop to an Employee section for instructions. | 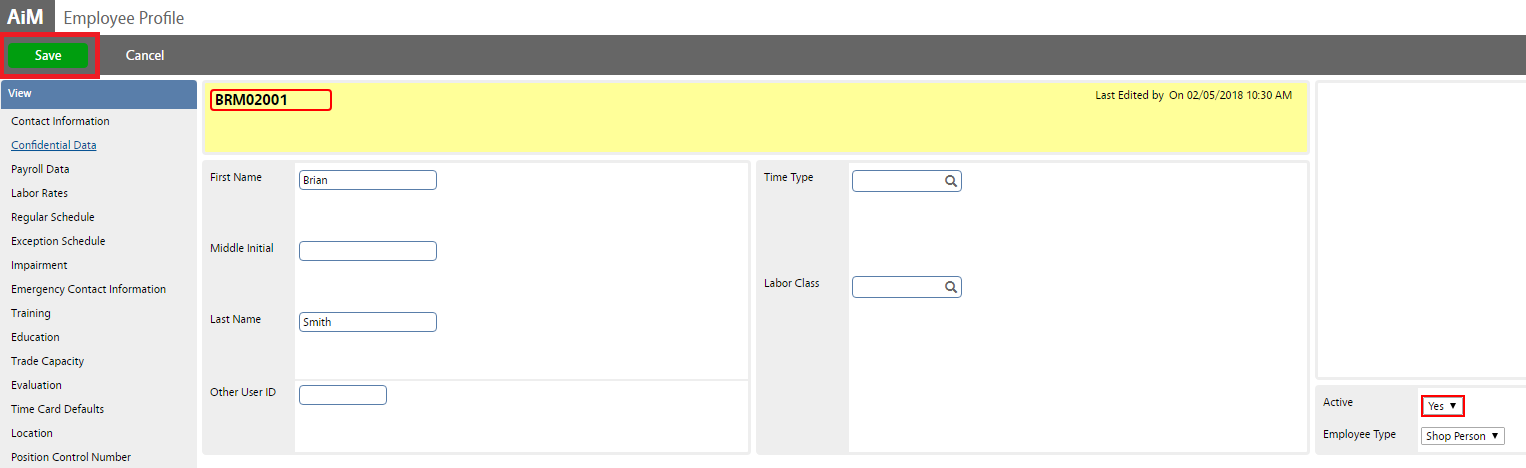 |
Assigning Shop to an Employee
Once the new hire record is in AiM, the employee can be assigned to a shop , see instructions below:
| 1. Select the Human Resources link from the Main WorkDesk Menu. | |
| 2. Click the Shop link. |  |
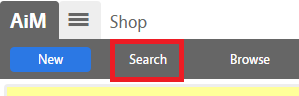
| 3. Click Search to search Shops.
The Search function allows you to narrow the results for Shops by field contents (such as Shop Name or Description). |
 |
| 4. Go through the options and enter search criteria such as Shop Name, description, etc.)
Then, click Execute based on the Search options selected. |
 |
| 5. The specific shop will appear as result of this search. Click on the Shop link. |  |
| 6. Click Edit, to edit the shop section and add the new hire to the shop list. | 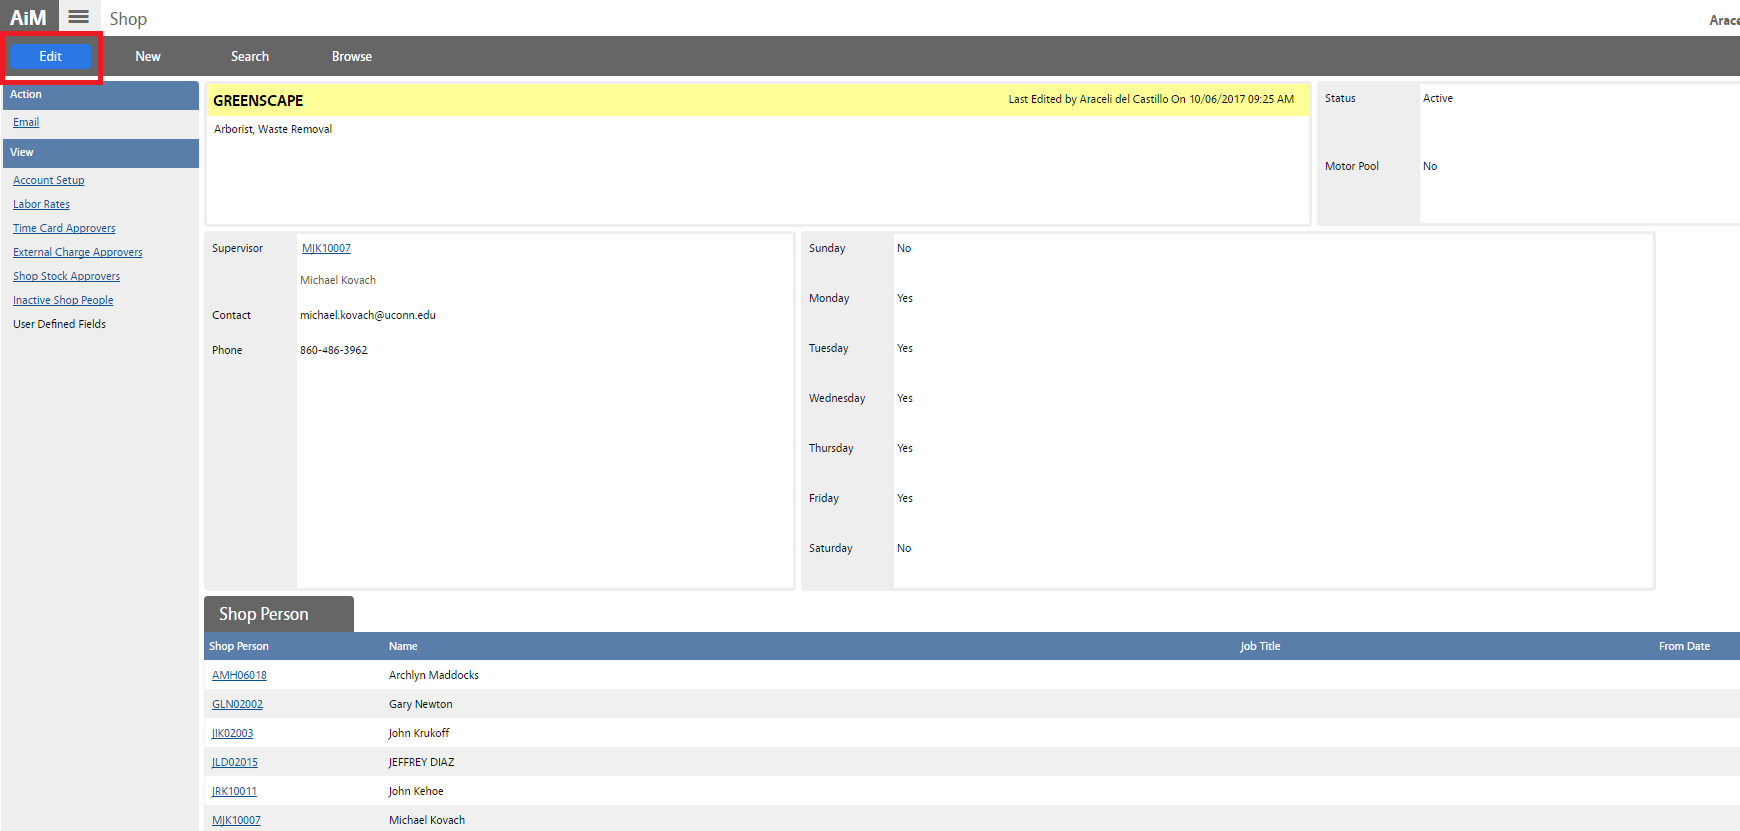
|
| 7. Click Add to add the employee to the shop list. |
|
| 8. Enter Employee Net ID if known, otherwise, click on the magnifier picture and follow prompts.
9. Click Add to add more employees. Then click Done to return to previous screen.
Note: You can always specify the start date although it is not mandatory field. This screen can also be used to deactivate employees and remove them from the shop (filling up the To Date option). |
 |
| 10. You will see the new employee has been added to the shop list. Click Save to save the record.
|

|
| 11. Northwest IT HelpDesk Support and System Administrator shall be notified anytime during the On-boarding process to proceed with create/add/update User Security, Roles, Workdesk (Quicklinks & Queries) and iPad assignment. | |

Transferring between AiM Shops
If this is a current FOBS Employee, Contractor or Student Worker who is transferring from one shop to another, HR Supervisor/Operations Admin shall request approval from Operations Center Management to proceed with shop transfer:
| 1. Select the Human Resources link from the Main WorkDesk Menu. | |
| 2. Click the Shop link. | |
| 3. Click Search to search the shop where the current FOBS employee is transferring from.
The Search function allows you to narrow the results for Shops by field contents (such as Shop Name or Description). |
|
| 4. Go through the options and enter search criteria such as Shop Name, description, etc.)
Then, click Execute based on the Search options selected. |
|
| 5. The specific shop will appear as result of this search. Click on the Shop link. | |
| 6. Click Edit, to edit the shop roster. | |
| 7. Click on the Shop Employee. | 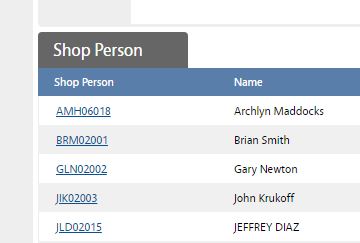 |
| 8. Enter “To Date” date (Last day of employment under this Shop) and click Done to return to previous screen. | 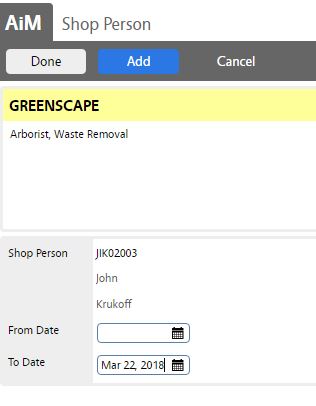 |
| 9. Click Save to save and update the roster. |  |
| 10. Click Search to search the shop where the current FOBS employee is transferring to. |  |
| 11. Go through the options and enter search criteria such as Shop Name, description, etc.) Then, click Execute based on the Search options selected. | 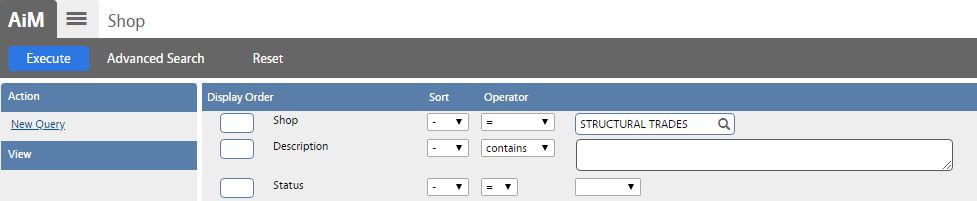 |
| 12. Click Edit, to edit the shop roster. |  |
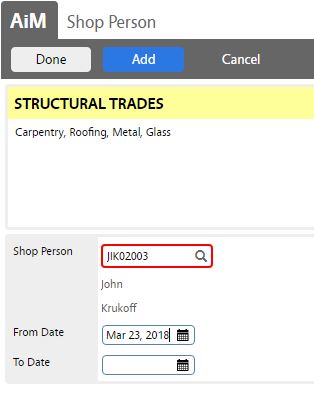
| 13. Enter Employee Net ID if known, otherwise, click on the magnifier picture and follow prompts.
|
 |
| 14. Click Add to add more employees. Then click Done to return to previous screen.
Note: You can always specify the start date although it is not mandatory field. |
 |
| 15. You will see the new employee has been added to the shop list. Click Save to save the record. | 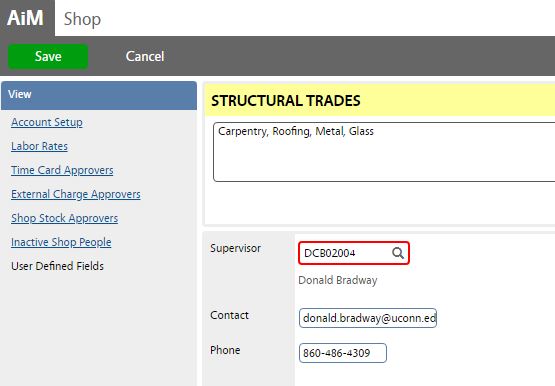 |
Updating the Receiving Address
| 1. Select the Human Resources link from the Main WorkDesk Menu. | |
| 2. Click the link to the Employee Profile. | |
| 3. Click Search to search Employee Profile information.
The Search function allows you to narrow the results for Employees by field contents (such as First Name or Last Name, etc.) |
|
| 4. Go through the options and enter search criteria such as First and Last Name, then click Execute. | 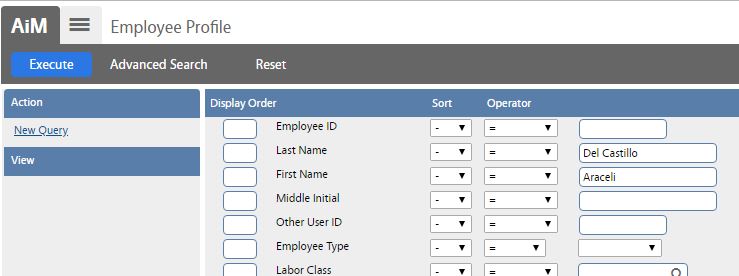 |
| 5. Click on the user NET ID hyperlink and click Edit to edit the Employee Profile. | 
|
| 6. Click on Contact Information link to update receiving address. | 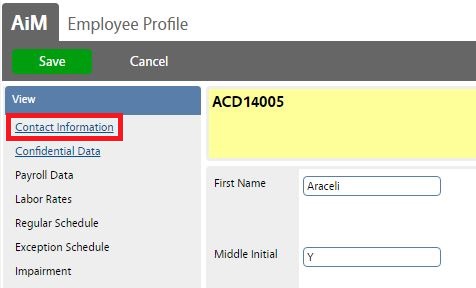 |
| 7. Update receiving address info if necessary and then click Done to return to previous screen. | 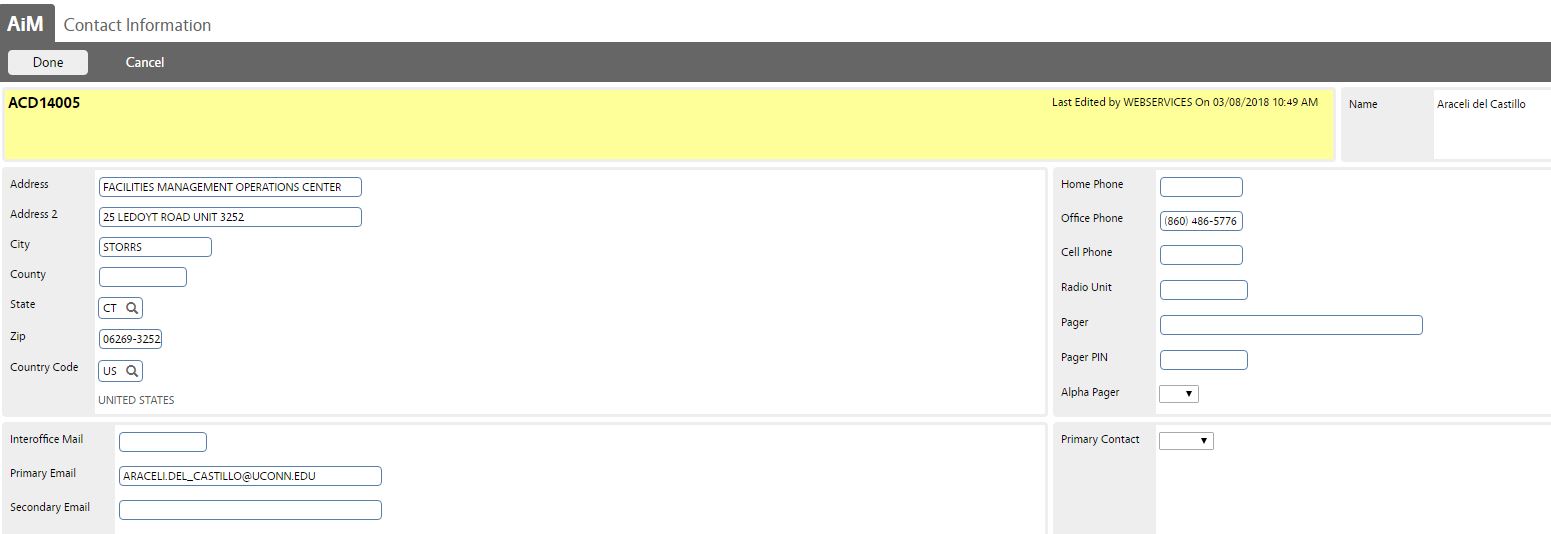 |
| 8. Click Save to save the updates. |  |

ROLES RESPONSIBILITIES:
1. HR Supervisor: (Permanent/Temp Staff & Affiliates only)
HR Supervisor is responsible for employee profile creation and verification (Permanent/Temp and Contractors Staff). Will assign new employees to their Shops and will notify Northwest Helpdesk and AiM Administrator about these new hires.
2. Operation Admin: (Shops Student Workers)
Operation Admin is responsible for Employee Profile creation and verification (Shop Student Workers only). Will assign student workers to their Shops and will notify Northwest Helpdesk and AiM Administrator about these new hires.
3. Operations Center Management:
Operation Center Management is responsible for assisting with Employee Profile audit for current shop employees and students workers.
4. Shop Supervisor:
Shop Supervisor is responsible for work re-assignment and timecard approvals. Will notify HR Supervisor & Operations Admins when employee is clear and good for shop transfer.
5. System Support (Northwest Helpdesk):
System Support is responsible for the distribution, assignment and tracking of iPads for new employees and students.
6. System Administrator:
System Administrator is responsible for maintaining and configuring user securities for new and current AiM users. System Administrator will also serve as HR Supervisor, Operations Admin and Operation Center Management backup person to create new employees profiles and assign them to their shops in the AiM system.
Return to Job Aides Page